Unlocking Openflow's Potential: Practical Solutions to Real-World Data Integration Challenges
Mathias Höreth
Mathias Höreth
Principal Consultant
Mathias is a consultant with many years of experience in Data Vault modeling, DWH architecture and DWH automation. He advises customers from various industries, such as insurance companies, on these topics. His project experience covers the complete value chain from analysis, planning, design and implementation with focus on Snowflake and Oracle technologies. He also has profound knowledge in Domain-Specific-Languages (DSL) for code generation, Big Data and Cloud technologies as well as agile project approaches.
Snowflake’s Openflow makes data integration faster, simpler, and more efficient. In this article, we’ll show how these benefits play out in practice—using a real-world example to highlight strategies for handling large volumes of small incoming files with ease and performance.
Table of Contents
Openflow is Snowflake’s latest enterprise-grade solution: an open, extensible, and secure data integration platform that enables real-time, bidirectional data exchange within Snowflake itself. It fills a critical gap—especially in ETL workflows where data extraction and loading have traditionally depended on third-party tools like Fivetran, Airbyte, or other platforms.
In this article, we demonstrate how Openflow can simplify and optimize existing data pipelines. Using a typical API-based challenge as our example, we’ll present two practical solutions—built entirely with Openflow. These approaches require no custom scripting or complex logic. Instead, they’re straightforward, scalable, high-performance—and easy to follow, step by step.
Let’s face it—real-world IT environments are rarely perfect. Systems evolve over time, often creating unnecessary complexity. Not every organization needs real-time data delivery; many still rely on traditional batch processing, which remains common practice in numerous business intelligence (BI) setups. And getting access to source systems is rarely as smooth as it sounds in textbooks—or as we’d like it to be.
In this article, we walk through a real client scenario: the task was to load a complete snapshot of one of their systems into Snowflake at regular intervals—daily, weekly, monthly, or based on any other cadence. While applications typically offer batch interfaces for extracting such snapshots, this one did not. Instead, it exposed only a REST API accessible via HTTP, allowing data retrieval solely through individual ID calls.
After consulting with the system experts, the recommended solution involved a two-step process:
Use API endpoint getAllIDs: Initiate the process by making an initial API call to retrieve the complete list of unique IDs from the application. This list serves as the foundation for the data extraction process.
Use API endpoint getDataForID: Iterate over the list of unique IDs and send individual API requests to retrieve the corresponding data for each one. This ensures that detailed information is collected for every unique ID.
While this method was technically the only option, it introduced a number of operational challenges. Iterating over thousands of IDs is time-consuming and doesn't scale well. It creates countless small responses—each one becoming a separate file. Managing large volumes of small files leads to increased latency and I/O overhead from frequent metadata operations and processor startups. As a best practice, Snowflake recommends using larger files—typically 100 to 250 MB compressed—to ensure better performance and lower overhead.
Although we couldn’t change how the client’s system exposed its data, we could control how we handled those small files. The sections that follow present two practical Openflow-based solutions for efficiently ingesting and managing large volumes of small files. These approaches are intended as both implementation guidance and inspiration for building your own integrations.
Simulating the Client’s Application Using Openflow
You may not have access to a similar system but still want to explore use cases involving high volumes of small files. That’s why we’ll begin by demonstrating how to simulate this scenario entirely within Snowflake.
To start, we’ll build a simplified application in Openflow that replicates the client’s environment. We’ll use Snowflake’s TPC-H sample dataset in combination with the Snowflake SQL API—a REST API that allows data to be queried and updated directly within a Snowflake database. If you're not yet familiar with the Snowflake SQL API, we recommend referring to the official documentation for detailed guidance.
First Step: Retrieve the List of All IDs
Our first task is to generate a list of unique customer IDs. We'll use the table SNOWFLAKE_SAMPLE_DATA.TPCH_SF1.CUSTOMER as our source, accessed via Snowflake’s SQL API. To do this, we construct a POST request that retrieves all customer keys, which will serve as IDs. These IDs will then be used in the next step to query the API individually for each customer’s full dataset.
As previously mentioned, we’ll use Openflow to implement this entire process. The following flow outlines a sample implementation and demonstrates how to complete this step in a structured, repeatable way.
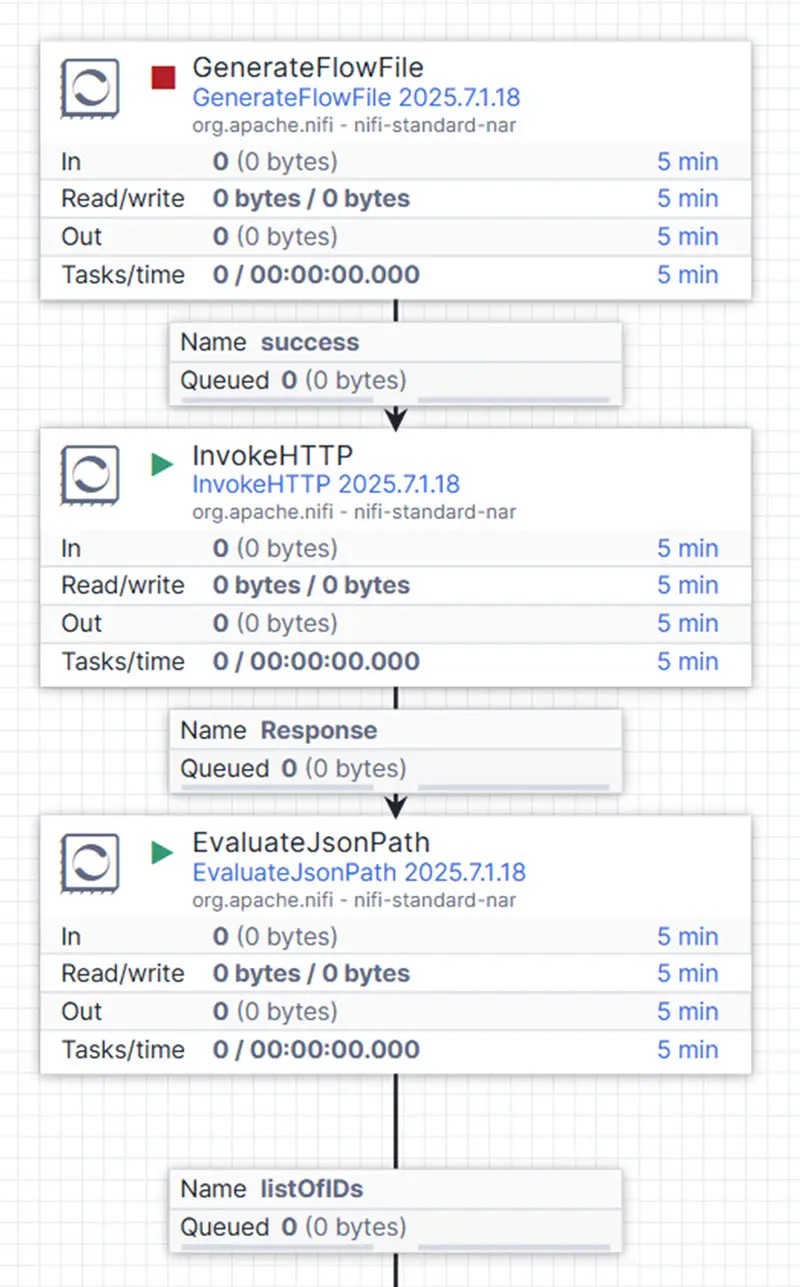
Our primary processor, InvokeHTTP, initiates the call to Snowflake’s API endpoint at /api/v2/statements. In Openflow, this processor behaves in a specific way: each FlowFile attribute is passed into the request header, and the content of each incoming FlowFile becomes the request body.
To build the request, we use the GenerateFlowFile processor to define the body content. This includes both the compute warehouse and the SQL statement we want to execute via the Snowflake SQL API. In our example, we retrieve all customer keys from the table SNOWFLAKE_SAMPLE_DATA.TPCH_SF1.CUSTOMER, which contains approximately 150,000 records.
Next, the request headers—configured as attributes—specify the content type (JSON) and the authorization method. We use a Personal Access Token (PAT), which was generated through Snowflake Snowsight.
The response from InvokeHTTP is returned in JSON format and stored in the flow file’s content within the response queue. However, since this response includes both relevant data and metadata, we need to extract only the list of customer keys. We do this with the EvaluateJsonPath processor, which parses the response and isolates the complete key list required for our application.
And that’s it: with just three processors, we’ve successfully simulated access to an HTTP API that returns a unique list of IDs. The output is a single flow file containing all customer keys from the SNOWFLAKE_SAMPLE_DATA.TPCH_SF1.CUSTOMER table.
In the second step of simulating the client’s system, we focus on retrieving the actual data for each individual key. To achieve this, we iterate through the list of customer keys and send a separate API request for each one.
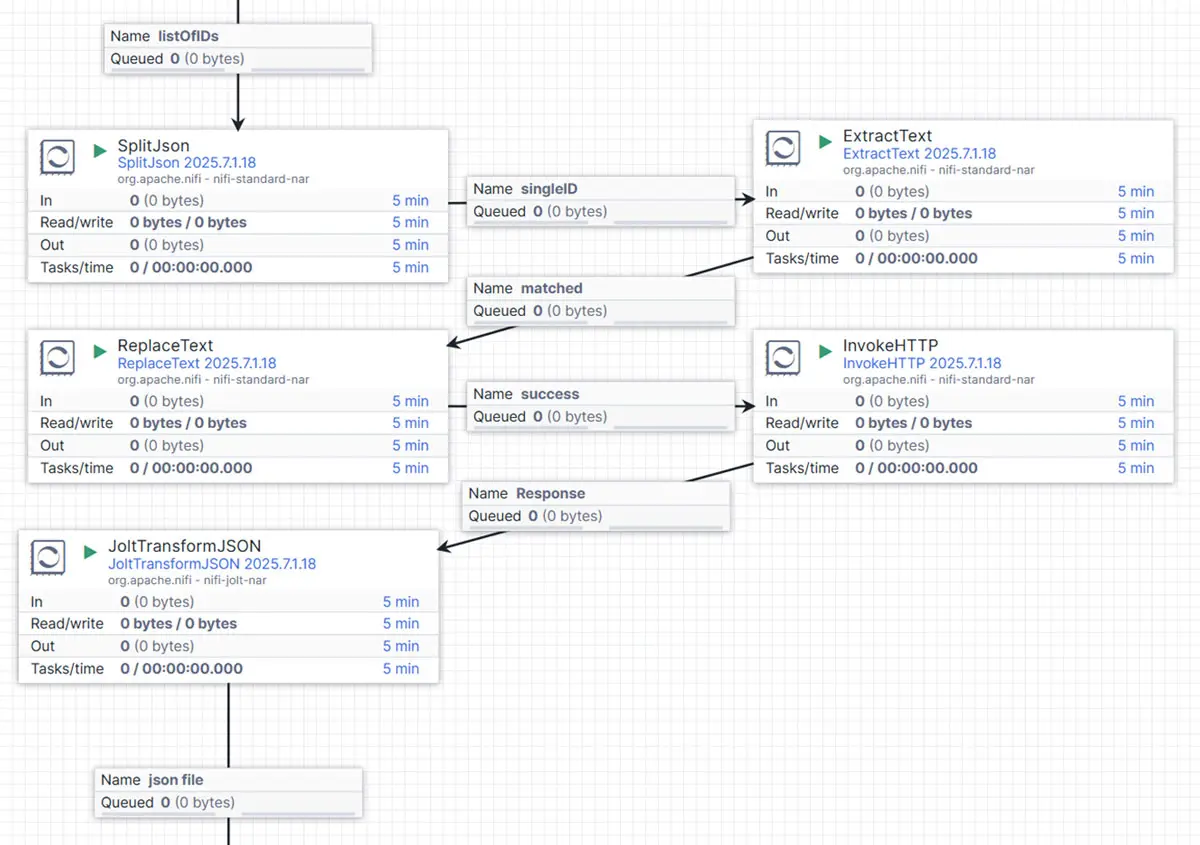
The flow for this process is structured as follows:
First, we use the SplitJson processor to break the list of customer keys into individual flow files—each one containing a single key. After the split, every flow file holds one key as its content.
Since we’ll need each key later as a flow file attribute (to build the API request body), we apply the ExtractText processor to extract the content and store it as a new attribute, which we name ID_VALUE.
Next, the ReplaceText processor uses this ID_VALUE attribute to dynamically generate the request body. This body is then passed to the InvokeHTTP processor, which sends a separate API call for each individual customer ID—just as we did earlier when retrieving the full list of keys.
The response from InvokeHTTP is again stored as the content of the flow file—this time containing the actual customer data in JSON format. Since we're only interested in the data payload and not the surrounding metadata, we optionally use the JoltTransformJSON processor to extract just the relevant fields. Whether you include this step depends on your specific needs.
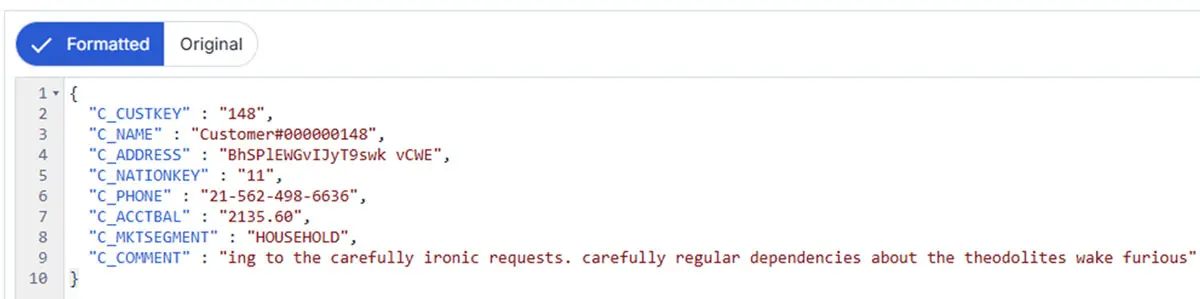
And that completes the second step: each flow file now contains a clean JSON document with the full dataset for a single customer.
By combining the first and second steps, we've successfully simulated the client’s application. This setup generates individual files via API calls—each file containing the full dataset for a single customer record.
As expected, this results in a very large number of files. In our case, the total exceeded 150,000. A key performance consideration here is that the main execution bottleneck comes from issuing individual API calls for each unique ID.
Fortunately, Openflow allows us to parallelize these operations with ease. By adjusting the processor settings, we can enable multiple concurrent executions, significantly improving processing speed and overall efficiency.
Next, we’ll look at how to seamlessly ingest these files into Snowflake.
Our major settings:
Processor
Attribute
Value
SplitJson
JsonPath Expression
$[*]
ExtractText
ID_VAL
(.*)
ReplaceText
Replacement Strategy
Regex Replace
Replacement Value
{ "warehouse" : "<warehouse name>", "statement" : "select * from SNOWFLAKE_SAMPLE_DATA.TPCH_SF1.CUSTOMER WHERE C_CUSTKEY = ${ID_VAL}"
}
Optimizing Small File Handling with Openflow: Two Effective Solutions
After successfully simulating the client’s application using Snowflake’s SQL API, we’re now ready to explore two approaches for efficiently handling large volumes of small files with Snowflake Openflow.
The first solution utilizes Snowpipe Streaming, while the second follows a more traditional batch ingestion strategy using blob storage.
Snowpipe Streaming
This is arguably the simplest, most cost-effective, and time-efficient method for ingesting data from an API-based application directly into Snowflake. With Openflow, you can use the PutSnowPipeStreaming processor to stream data directly into a designated Snowflake table.
The setup is straightforward, enabling near real-time ingestion and scalable processing—without compromising performance. It’s also highly cost-efficient thanks to recent changes in Snowflake’s pricing model: instead of being billed per file ingested, you’re now charged per gigabyte of data. This adjustment can reduce costs by an average of 50%.
Our flow extension for this solution is structured as follows:
Incoming flow files—formatted as standard JSON—are streamed directly into the target table. It's important to note that this table must already exist in your Snowflake account and include the necessary columns that match the structure of the incoming JSON data.
In our testing, we used the PutSnowpipeStreaming processor with its default settings and achieved excellent performance. There was no noticeable delay between the API requests (triggered by the InvokeHTTP processor running in high parallelization mode) and the actual data ingestion. If needed, you can fine-tune performance by adjusting settings such as Client Lag and Maximum Batch Size.
Batch Ingestion Using Blob Storage
Our second solution is more complex and addresses a different scenario. Suppose you don’t want to ingest data directly into Snowflake—instead, you want to first store it in a blob storage system, which serves as a data lake layer for your data warehouse. This could be an AWS S3 bucket, Azure Blob Storage, or any other object storage.
You might also be building a medallion architecture, where the Bronze layer stores raw and standardized data formats. That’s exactly the kind of architecture we’ll demonstrate using Openflow.
The process begins by storing the API-generated files in their raw format in an S3 bucket. From there, we standardize the files into a unified format—such as Parquet—and consolidate the numerous small files into fewer, larger ones. This optimization enables better performance when ingesting data into Snowflake via the traditional COPY INTO command and ensures alignment with Snowflake’s recommended file sizes.
Load the Raw Files to AWS S3
To start, we extend our API flow to store the retrieved data in blob storage—in our case, an AWS S3 bucket. This extension enables us to persist the raw files before further processing.
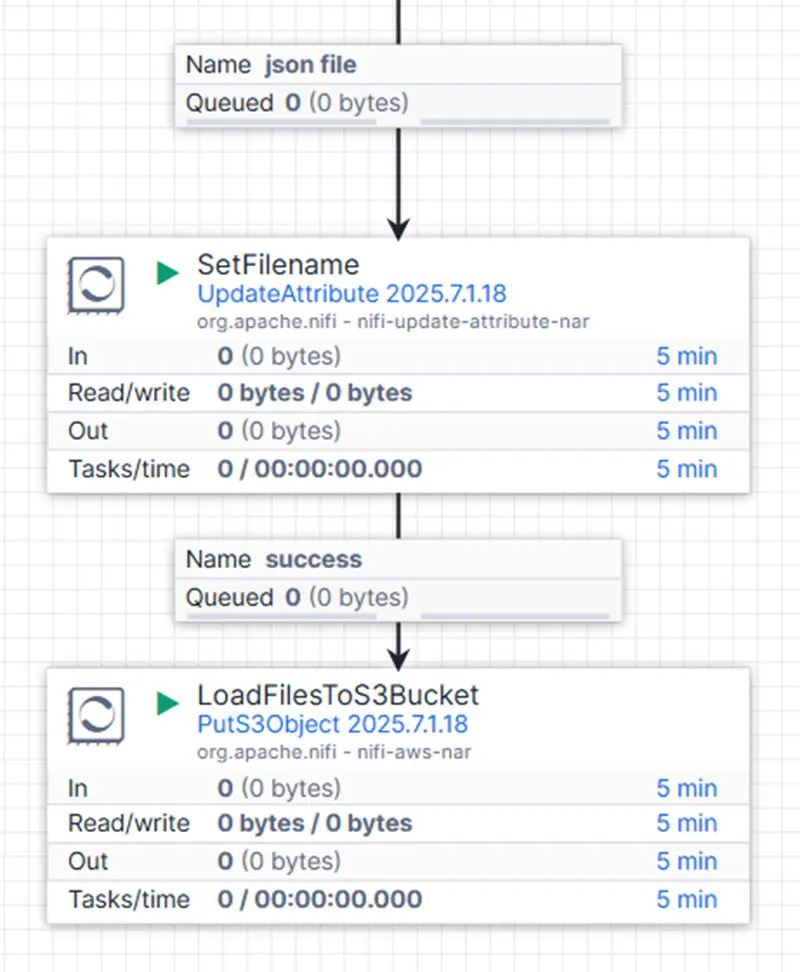
Here’s what that flow looks like:
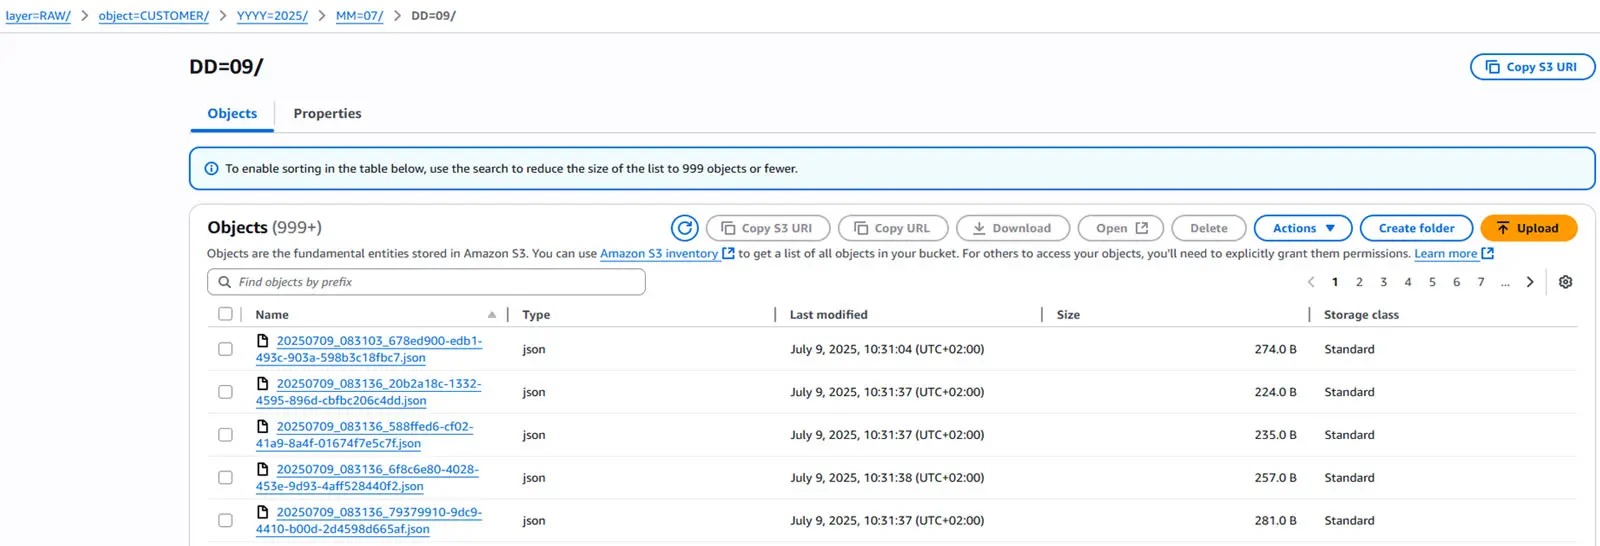
In the first step of this extension, we rename the incoming JSON files using the UpdateAttribute processor. This processor applies a function to structure the file paths according to the expected directory format within our blob storage. The structure follows a partitioned object layout, such as:
We also assign each file a unique name by combining a timestamp with a system-generated UUID.
In the second step of this extension, we use the PutS3Object processor to upload all renamed files to our S3 bucket in their raw format. It’s a straightforward process—and once completed, our uploaded files are organized as follows:
Next, we transform the files stored in our S3 bucket—originally placed in the raw layer—into standardized structures. This involves two main steps: converting all JSON files into the Parquet file format and merging smaller files into larger ones.
This optimization improves storage efficiency and enforces consistent schema definitions. As a result, it delivers measurable performance and cost benefits. In particular, consolidating small files enhances ingestion throughput and aligns with Snowflake’s recommended file size guidelines for optimal processing.
In our setup, the S3 directory structure is organized as follows:
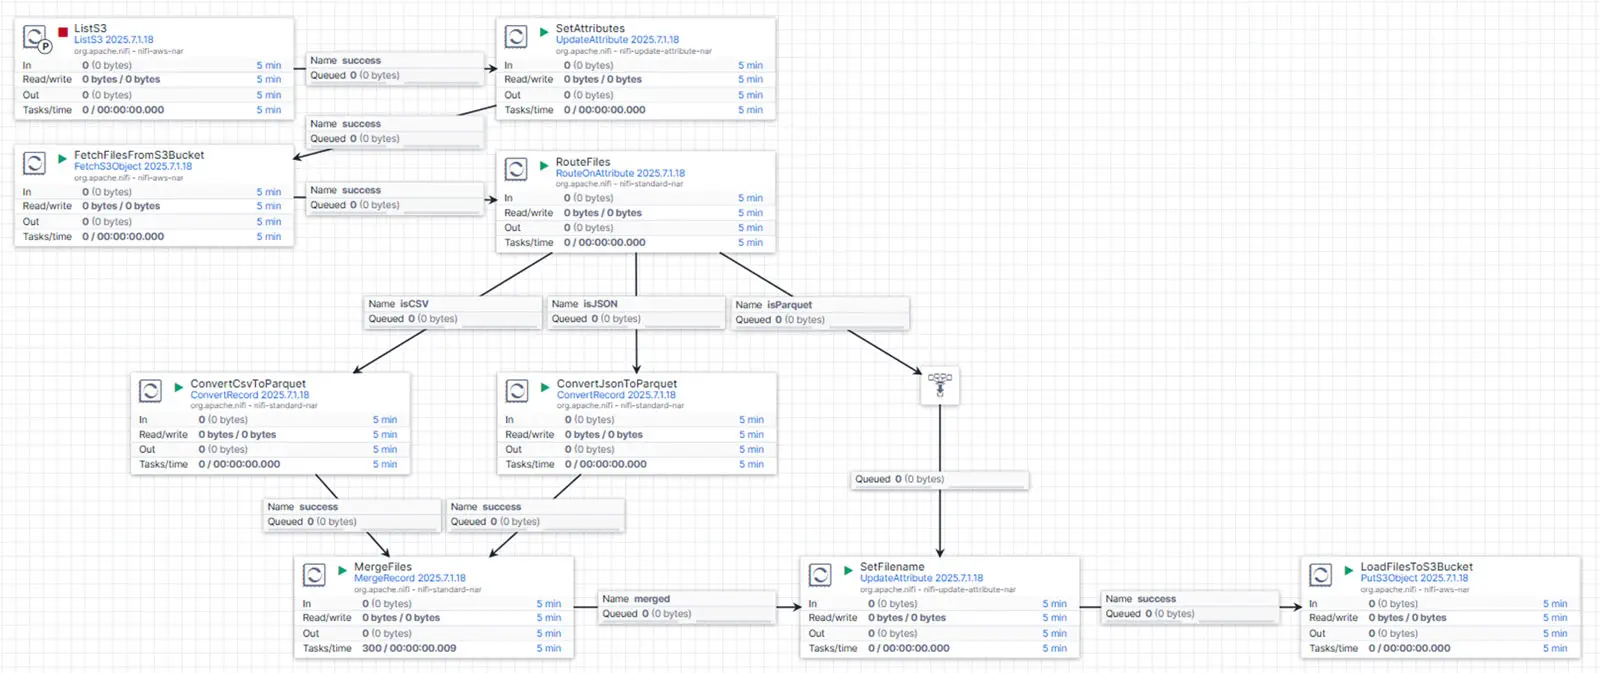
The flow we use for this process is structured as follows:
We begin with the ListS3 processor, configured to return only files from the directory path layer=RAW/. The processor's tracking settings allow us to manage how previously processed files are handled. This built-in tracking mechanism acts as a native memory, enabling incremental file processing.
We select a tracking strategy based on file timestamps.
Next, we use the UpdateAttribute processor to define several key flow file attributes required for downstream steps. These attributes—such as ${S3FILENAME}, ${S3FILEEXTENSION}, ${S3OBJECT}, and ${S3PATH}—are derived from the original system-generated filename.
Next, we employ the FetchS3Object processor to load the raw files from the S3 bucket into Openflow. Using the flow file attribute ${S3FILEEXTENSION}, we determine the processing route for the next step via the RouteOnAttribute processor. This processor directs files based on their extension into separate flows, each tailored to a specific file format. In our setup, this routing is implemented for .csv, .json, and .parquet files:
isCSV: Files are routed to the ConvertCsvToParquet processor, which reads CSV input and converts it to Parquet format.
isJSON: Files are routed to the ConvertJsonToParquet processor, which reads JSON input and converts it to Parquet format.
isParquet: These files are simply passed through the pipeline without any transformation.
Since our use case exclusively involves JSON files, all files are routed into the "JSON flow," where the ConvertRecord processor handles the transformation into Parquet. For this, we configure the processor with JsonTreeReader as the input reader and ParquetRecordSetWriter as the output writer.
Similarly, the ConvertCsvToParquet processor is configured to handle CSV input using CSVReader, although it is not used in our scenario. Nonetheless, this demonstrates that the flow supports multiple formats seamlessly.
After conversion, we use the MergeRecord processor to combine smaller Parquet files into larger ones. The merging process is based on a partition key—specifically, the previously assigned ${S3PATH} attribute, which includes all relevant partition dimensions: layer, object, and date.
To optimize merging, we configure the processor to:
wait 30 seconds before merging,
limit each merged file to a maximum size of 250 MB, and
group up to 10,000 records per batch.
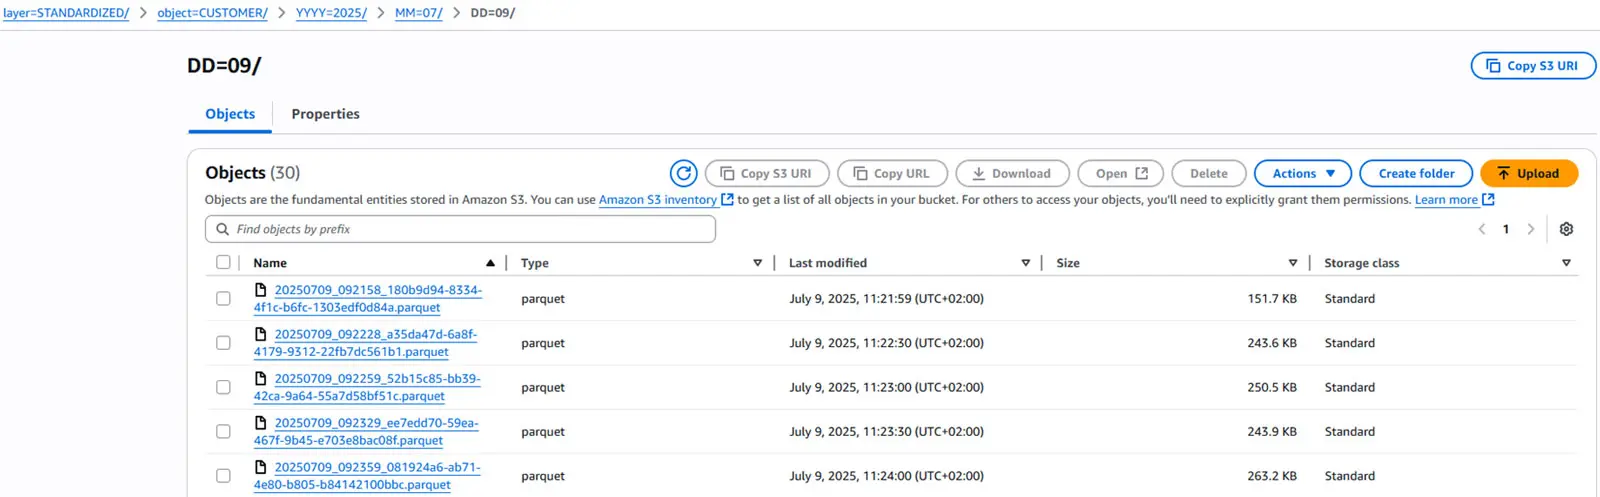
In our tests, this configuration produced excellent results: over 150,000 raw JSON files were merged into just 90 Parquet files—with no additional tuning. You can, of course, adjust the configuration to meet your own performance goals.
In the second-to-last step, we use the UpdateAttribute processor to assign a new filename to each merged file. This filename reflects the STANDARDIZED directory layer and includes a timestamp and UUID for uniqueness.
The final step is handled by the loadFilesToS3Bucket processor, which uploads the renamed, merged Parquet files back into the AWS S3 bucket—now organized under the new standardized directory structure.
Our uploaded files now follow a clean and consistent layout.
With this step completed, all files from the original data flow have now been converted into Parquet format, consolidated into consistent file sizes, and efficiently stored in our blob storage. And all of it—without a single line of custom code, achieved in just a few straightforward steps.
In our final step, we ingest the standardized files from blob storage into Snowflake. To accomplish this, we use an intermediate internal stage in combination with the COPY INTO command.
Of course, other ingestion methods are also supported—such as external stages, external tables, Snowpipe Streaming, Snowpipe, or even Iceberg Tables.
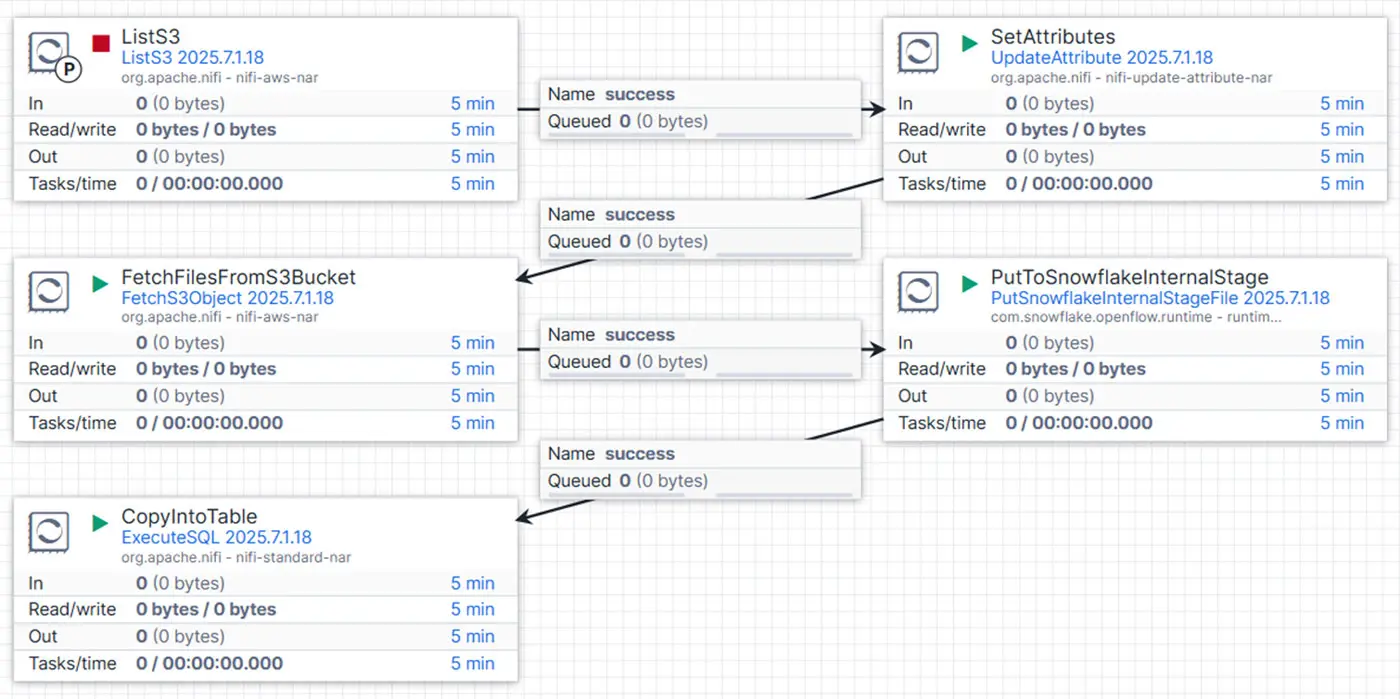
The following diagram illustrates the flow we used:
The first three steps mirror those from our standardization flow. We begin by listing files in the S3 bucket using the ListS3 processor—this time targeting the STANDARDIZED layer. As before, we leverage the built-in tracking functionality to support incremental processing.
Next, we assign the ${S3OBJECT} attribute to each flow file. This value corresponds to the target table in Snowflake and is critical for dynamically constructing the subsequent COPY INTO command.
The FetchFilesFromS3Bucket processor then loads the standardized files from S3, making them available for downstream processing. These files are passed to the PutSnowflakeInternalStageFile processor, which uploads them to a Snowflake internal stage. By setting a prefix in this processor, we define a structured staging path that maps each object (e.g., CUSTOMER) to its own folder. For example:
@<database>.<schema>.<stage>/CUSTOMER
In the final step, we use the ExecuteSQL processor to run Snowflake’s COPY INTO command, which ingests the Parquet files from the internal stage into the appropriate target table. The command is generated dynamically using the ${S3OBJECT} variable we previously set. Thanks to Snowflake’s MATCH_BY_COLUMN_NAME functionality, incoming data is automatically matched to the correct target columns—no custom INSERT statements required. Additionally, the PURGE = TRUE setting ensures that files are automatically deleted from the internal stage after loading.
And that’s it! With the logical steps of extraction, standardization, and ingestion, we've built an end-to-end pipeline capable of handling massive volumes of small files from external applications. This solution transforms them into standardized, scalable, Snowflake-ready datasets—ready for downstream analytics.
COPY INTO <database>.<schema>.${S3OBJECT}
FROM @<database>.<schema>.<stage>/${S3OBJECT}
FILE_FORMAT = (FORMAT_NAME = 'RAW_DATA.FF_PARQUET')
PURGE = TRUE
MATCH_BY_COLUMN_NAME = CASE_INSENSITIVE ;
Conclusion
In this article, we explored how Openflow can tackle a real-world data integration challenge: ingesting and managing large volumes of small files from a client application. We demonstrated how Openflow can handle applications that expose data only via individual ID-based API endpoints—rebuilding this entire scenario within Snowflake.
We also showcased Openflow’s ability to rapidly build robust pipelines by presenting two practical solutions to this challenge. Both were easy to implement, script-free, and highly scalable—making it possible to test and adapt the setup in your own infrastructure.
In the first solution, we used Openflow with Snowpipe Streaming to enable real-time ingestion into Snowflake. In the second, we established a data lake foundation using blob storage, where we standardized and consolidated files before batch loading them into Snowflake. These approaches highlight Openflow’s flexibility and power in simplifying data integration—from initial extraction to efficient ingestion.
In short: Openflow unifies data integration into a single, powerful platform.
It offers extensibility, interoperability, and supports connections to virtually any data source or destination. Whether you’re replacing legacy ETL tools or designing modern pipelines for Snowflake, Openflow is a strong alternative—and more.
It’s more than just "NiFi as a Service."
It’s cloud-native with elastic scaling, provides a connector ecosystem including native connectors as well as Snowflake-optimized connectors, leverages AI use cases through handling multimodal data, offers the ability to trigger Snowflake’s Cortex AI services, and much more.
If you’re also facing challenges of data integration and want to create real added value for your company, we’re happy to support you. Contact us for an initial, non-binding consultation to discuss your specific use case.
Want To Learn More? Contact Us!
Your contact person
Helene Fuchs
Domain Lead Data Platform & Data Management
Your contact person
Pia Ehrnlechner
Domain Lead Data Platform & Data Management
Who is b.telligent?
b.telligent – that’s Data Analytics, AI, Customer Engagement, and Data Visualization. It’s Germany, Austria, Switzerland, and Romania. But most importantly, it’s our team: people with a true passion for data, working together to create innovative solutions that drive sustainable progress for businesses.
We'll show you how to get to actionable insights and decisions faster with Snowflake Intelligence. And: How to realize use cases and increase the ROI of your data platform: with little effort and without technical know-how.
With Openflow, Snowflake fundamentally simplifies data integration: extraction and loading happen directly as part of the Snowflake platform — no external ETL tools required. This significantly reduces integration effort and streamlines the entire pipeline management process.
Exasol is a leading manufacturer of analytical database systems. Its core product is a high-performance, in-memory, parallel processing software specifically designed for the rapid analysis of data. It normally processes SQL statements sequentially in an SQL script. But how can you execute several statements simultaneously? Using the simple script contained in this blog post, we show you how.