


Parameterization of loading jobs via variables is nothing special anymore: All common ETL tools today offer appropriate ways to adapt jobs to different environments (development / test / production). In addition to classic scalar variables, this blog post demonstrates the use of an even more powerful concept: Grid variables.
In Matillion from a London-based cloud analytics software provider, these variables can be used to very easily generalize similar jobs and apply them to numerous objects. Implementation is thus less similar to a single ETL job, rather more to a framework. Let's take this into perspective using the example of an operational data store (ODS). The first two steps, conception and handling of metadata, are presented in more detail in this part of the blog article. Part 2 of the article is recommended for steps 3 and 4 which deal with the use of metadata and the topic of operationalization.
Let's get started: The task is to fill an SCD2-historicized ODS. Processes here are to be controlled via the structure of the ODS tables. For this example, we assume a full load which, however, can be adapted very easily to a delta load.
Step 1: Conception
Before starting with concrete implementation, let's first have a look at the basic loading process. This shows which information we need to control the process. We also define some naming conventions.
First, we specify that the tables in the ODS have the same name as in the source system, but are suffixed additionally with "_hist". The column names in the respective source and ODS tables must also match. For historicization, we introduce the columns "valid_from" and "valid_to" in the ODS. Here, we store the start and end of validity on a daily basis, according to the SCD2 definition. "valid_from" is understood here as being inclusive, while "valid_to" is understood as being exclusive. We will dispense with a use of additional historicization columns such as update flags and version counters. They could easily be inserted though.
In principle, loading takes place in four steps:
- Staging of source data
- Comparison of data in staging with the data status in the ODS
- Setting of the "valid_to" date for changed and deleted data sets
- Insertion of changed and new data sets
For staging of source data, we need to know which table and which columns to load. We therefore need a variable which contains the table name, as well as a variable which contains the list of column names. We will realize the latter with a grid variable. All columns existent in the corresponding ODS table are required - with the exception of "valid_from" and "valid_to" - which, of course, do not exist in the source table.
To be able to compare the loaded data with the current data status, we need the table and column names once again. This time, however, we need to distinguish between key attributes and descriptive attributes. To be able to recognize the key attributes, it is essential to define a primary key in the ODS tables. In addition, we need mapping which defines whether we want to include old or new attribute values (or both) in the result data sets.
Our "ODS" use case requires only new values for all descriptive attributes. The value of the "valid_from" column from the old, i.e. still valid data set, is also required to form the complete primary key for the following update operation.
To set the "valid_to" date, the primary key of the concerned data sets is required in addition to the table name. This must now necessarily include the "valid_from" column, otherwise all historicized versions of a data set would be furnished with the same "valid_to".
To insert the new data sets, we need the full column list of the ODS table in addition to the table name.
Step 2: Handling metadata with grid variables
Now that we've identified all the required metadata, we need to obtain them. We start with the external orchestration job, which we call "Source2ODS".
The name of the table to be processed can be easily passed from outside as a call parameter. For this, we define a "table_name" job variable of the text type, and give it a default value. Though the latter is not really needed and can be removed later, it helps enormously during the development phase. The default value allows us to start the job directly during development, without needing a calling job which explicitly sets "table_name".

Now that we know the name of the table to be processed, we can use the "table metadata to grid" component to load the table's metadata into a grid variable.
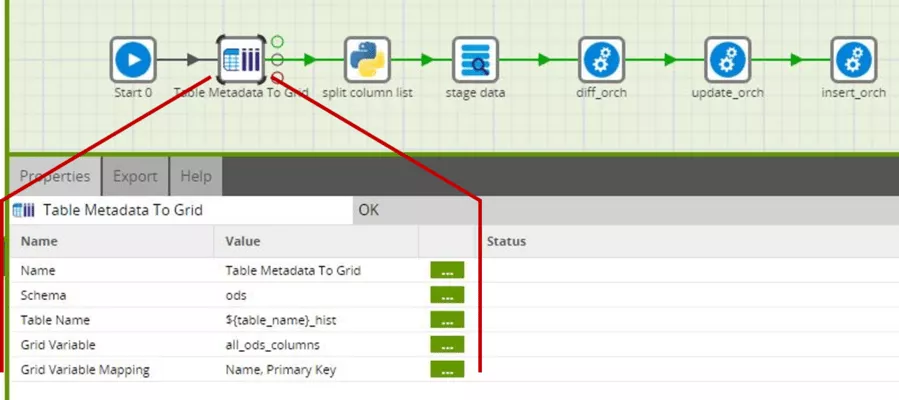
Because all our ODS tables are in the ODS schema, we will select this schema. For those who want to work with multiple schemas here, a schema's name can be passed as a variable from outside, similar to the table name. For the table name, we reference the value of a variable, in this case the "table_name" variable, with the notation ${…}. We can extend the text stored in it directly (without a concatenation operator or the like) with the suffix "_hist", and thus obtain the ODS table's name (refer to the naming convention from step 1).
Before selecting the "all_ods_columns" grid variable to be filled now, we need to define it.
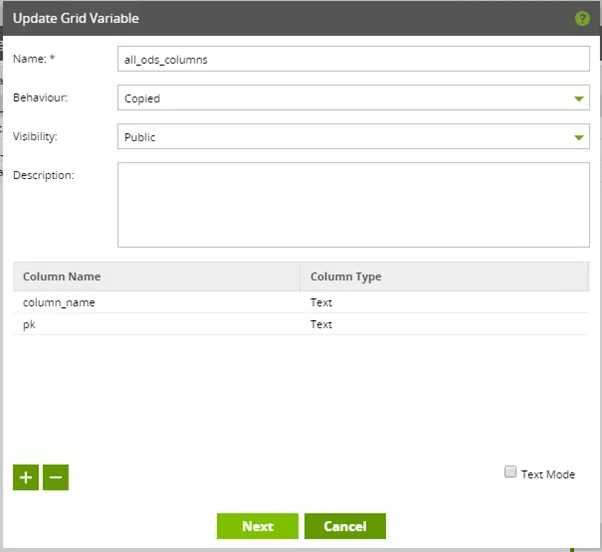
The "all_ods_columns" grid variable can be imagined as a table with two columns, namely "column_name" and "pk". Both are of the text type, "pk" actually being interpreted as a flag here. A "Yes" value here means that the corresponding column is associated with the ODS table's primary key. "No" means that it is not associated.
With the "mapping" grid variable, we finally determine which metadata is written to which column of the grid variables.

The Matillion component here ensures that the primary key only has the values "Yes" and "No".
As described in step 1 however, we not only need the ODS table's metadata, but must also derive a number of different column lists from these metadata. Matillion here provides some components for expanding or reducing grid variables.

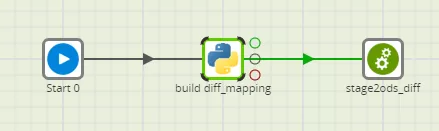
However, we will not use these components here. Instead, we will use the Python script component, which allows us to change the grid variables much more flexibly and ultimately more easily.
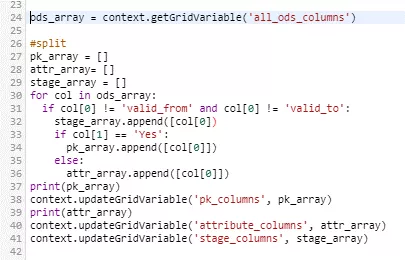
First, the "all_ods_columns" grid variable is read out as a list of lists. The resulting array is then processed, and finally each column name - except the "valid_from" and "valid_to" historicization columns - is copied to the list of stage columns and, depending on the PK property, to the list of PK columns or descriptive attributes. These lists are then used to initialize our own grid variables. Again, the employed grid variables must have been defined beforehand.
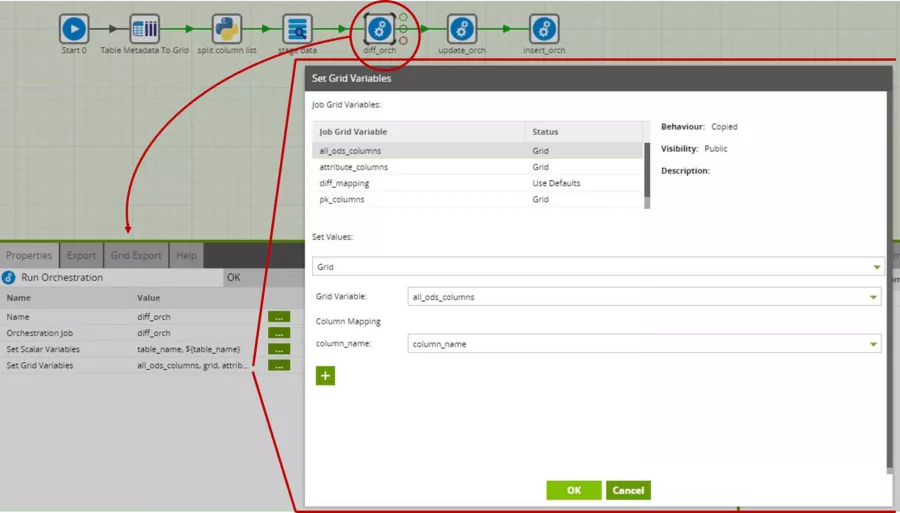
We also pass the grid variables thus created to the respective sub-jobs, which perform delta detection, update of the "valid_to" timestamps and insertion of new data sets. This is slightly more elaborate for grid variables than for scalar variables. Disciplined naming is highly recommended here, otherwise you will quickly lose track.
The sub-jobs now assemble any additionally required column lists and mappings from the passed lists.
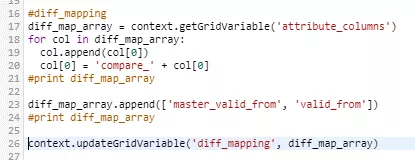
For example, the delta detection job requires mapping from the input columns of the two tables to be compared to the desired output of the "diff" component. This is generated by the Python code above, and stored in the "diff_mapping" grid variable to be defined beforehand.
Similarly, an "update_mapping" is created in the "update" job, and an "insert_mapping" created in the "insert" job, the respective Python codes here being very similar to the sample code above.


We now know how to conceive and handle metadata with grid variables. If you still have any questions about the topic, I remain gladly at your disposal for an exchange and further insights. More on the use of grid variables and operationalization to form a complete loading sequence is provided in part 2 of this blog series.